What makes a "good" connection?
[All the images on this page come from the fine work by Peter Strempel and Tweet at gGo .]
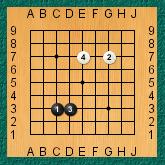
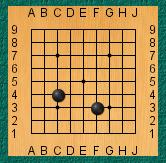
There is a clear advantage to be had in keeping all your stones connected in one group. (Of course, this is rarely possible in 19x19 games, but the principle is still good: the fewer groups you have the less you have to worry about.) Clearly, if two stones are touching, they form a good connection. Here is an example...
|
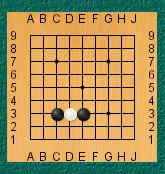
Let's look at the black stones first. There is no way that a white player can separate the two black stones on the bottom. But the player who builds walls one space at a time will soon fall behind. The white player has influence over a larger area of the board than the black player - after only two moves each. So the question is: how far can you get from the first stone and still maintain a good connection? |
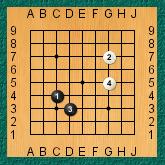
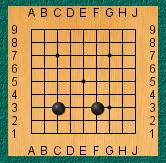
The diagonal connection
|
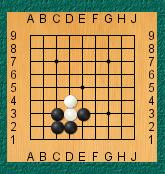
In this case, white could separate the two stones, but it would take two white plays, at D4 and at C3. In most cases, if white played D4, black would play C3 (and vice versa), so we can say that two stones next to each other diagonally are effectively connected - always assuming there are no enemy stones on the other two points. |
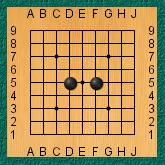
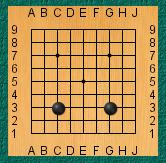
The one-space jump
You have probably noticed that the white player has been making the same kind of move in both examples so far, although in different directions. This is called a one-space jump. The move is called ikken tobi in Japanese, and there is a Go proverb which says "ikken tobi is always good."
|
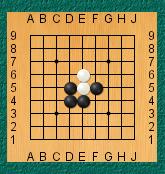
There is now a one-space jump between the two black stones, and it seems clear that white can attempt to separate the two stones by playing between them (at E5 in this diagram.) Black can then put the single white stone in atari as shown in the next diagram. |
| [If you skipped earlier pages, putting a stone in atari means threatening to capture it. Many players consider it a polite convention to say "atari" when a capture of one or more stones is imminent, something like saying "check" in Chess. However, it is not required.] |

|
|
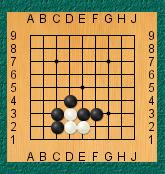
Assuming that white protects that stone by leading it out, black can now make a
strong connection with this move at D4, but that still leaves a cutting point.
White can play atF4 and split the black position. There
are various ways that the game could continue, but white has succeeded in
separating the two original stones. So does this look like a one-space jump is
NOT always good? Without going into it in more detail, I will just say that
white playing between the two stones is probably not a good idea, depending on
what other stones might be in the area, so the original one-space jump is
good.
I will have more to say about this later in the discussion about the third line. |
The knight's move
The knight's move is just like the knight's move in chess, although the Japanese term is the "horse's" move ( keima .)|
|
You may notice that there is a weakness between the two stones, and in fact there is another Go proverb that says "strike at the waist of a keima." There are two points that qualify as the waist, E4 and E5. Let's see what happens when white attacks. Whichever point white takes, black will take the other in an attempt to protect the connection... |
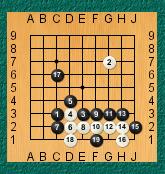
| ... and white cuts immediately. How this continues depends on what else is going on in the game, that is to say, what other stones are on the board. After all, Go is not just about one fight on the board, but a whole campaign of different battles in different areas. White has certainly broken the connection, but it is Black's turn and black has a great advantage in this diagram. You can probably see that Black can give atari at E6. If white attempts to read the stone out (at F5) it leads black G5, atari: a ladder that will allow black to capture the two white stones and leave white with one stone alone at D4. But supposing there were other white stones on the board... |
|
|
|
I am not suggesting this position would actually come up in a game, but here white has two potentially settled groups (just take my word for that for now), and can think about attacking the one black group. If white makes the same attack as in the last two diagrams... |
|
Now the ladder atari no longer works for black, and white has succeeded in
breaking black up into two groups. Better players will note that this was not
the best move for white, and they are correct, but that is a more advanced
subject and those better players probably shouldn't be reading this page anyway.
[Oh, all right... what is the best play? Go back to the previous diagram and consider that cutting black in two does not really threaten to kill either part, and that E8 settles the top white group as well as attacking black's territory on the top left. Also the simple one-space jump to G2 removes territory from black. G3 is also a possibility. Black will answer any of these plays and you still have the threat against the knight's move for later.] |
|
Other common positions
|
|
Bamboo jointHere is an interesting shape called a bamboo-joint (Japanese takefu. ) It may look artificial but it comes up very often in actual play. It's like two one-space jumps on top of each other. You should be able to verify that there is no way white can separate these stones unless black ignores two moves. This makes it one of the strongest ways to connect groups without actually placing stones right next to one another. |
One-space jumps on the third line.Here is a case where black has made a one-space jump on the third line and white tries to separate the two stones, by playing between them. But since we are so close to the edge, that won't work for white. It is very simple for black to give atari from underneath, and if white leads the stone out, as in the next diagram... |
|
|
Black can protect the cut on one side, as we saw before, but does not have to protect the cut on the other side, because a white stone cutting there would be forced to the edge and captured. [ White plays E2, black plays F2 atari.] This naturally leads us to the next discussion - hanging connections. |
Hanging connectionsIn the last diagram black connected at C2 with a "tight" connection, but sometimes it is better to make a "hanging" connection to push a little further. In this diagram, black decided to protect the right side rather than the left, but instead of playing the tight connection at E2, played at F2 - "hanging" off the cutting point. This protects against the cut, but allows the black group to extend a little further to the right. As before, white cannot cut at the other cutting point, C2, without losing the cutting stone. |
|
Another wayBut what happens if black gives atari from the top? Then things get more complicated, because it depends what other stones are on the board. The first few moves are forced, but after that you may have other considerations to take into account. Assuming no other stones nearby, black can follow along, pushing white on the second line where it is will be impossible to make a two-eyed group. If white plays F2 and G2, black can follow at G3 and H3. Then when white plays H2, black stops him at J2. There is no need to stop the advance earlier, and in fact if black tries to stop the line too soon he can get into serious trouble. |
|
Three common shapes on the third line
|
|
|
[For purists only: some will say that these last two are not jumps - tobi - but extensions - hiraki , because jumps usually go towards the middle of the board, and extensions along the edge areas. But you will see tobi used more frequently.]
Look at the first two cases. If you have a real Go board and stones you should work out what happens if you try to separate these stones. Since we are on the third line, the same general comments apply as for the one-space jump above. It is possible to attack this connection and cut, but that cut is going to be on the second line, where the black player can capture the cutting stone.
The third case - the three-space jump - is more complicated, and has lots of possibilities. [Perhaps there should be a web page just for this situation. Maybe one day...] The obvious place to attack is right in the middle, and black has the choice of attempting to join the two stones, by attacking the white stone directly, or forcing the white stone to run to the middle while building two separate strong positions on either side. As usual, everything depends on what else is happening on the board.
This last case is instructive: sometimes a player makes an extension that invites the other player to invade because he knows the invasion will strengthen his position.